Derailleur Adjustment
The following process is based on the instruction I received at the United Bicycle Institute with modification based on experience and other readings. I highly recommend attending UBI courses to build bicycle repair and maintenance skills.
The following describes the process for adjusting derailleurs. The sequence is important and can affect your success. The rear derailleur should be adjusted before the front derailleur. Finally, if you are having problems with an adjustment, it is generally better to go back and start from the beginning because each step affects the next.
This video provides some fine tuning tips I thought might add to what is below.
Rear Derailleur Adjustment
Rear Derailleur capacity should accommodate the difference between the smallest and largest chainring in the front plus the difference between the smallest and largest cassette cog in the back (typically for recumbents this means 52 – 30 = 22 plus 34 – 11 = 23 for a total of 45 teeth). Derailleur Capacities:
Short cage derailleur (50mm) has a capacity of approximately 29 teeth
Medium cage derailleur (73mm) has a capacity of approximately 33 teeth
Long cage derailleur (85mm) has a capacity of approximately 45 teeth
Rear Derailleur Adjustment Sequence
- Set High Limit
- Set Low Limit
- Set Cable Tension
- Set Body Angle
Set High Limit
- Remove or break the chain if it has been installed.
- If you are making the adjustment with the chain in place, shift the chain to the middle chainring in the front and the smallest cog in the back.
- Loosen the rear derailleur cable anchor/pinch bolt to relieve all tension on the derailleur if the cable is attached.
- Preset the adjusting barrels: Turn all the way in (clockwise) and then back out (counter clockwise) 1 revolution.
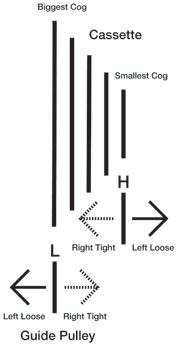
- Adjust the high limit screw to center the guide pulley (upper pulley) directly under the smallest cog. Refer to the diagram for the direction to turn the high limit screw.
- Alt. 1: Adjust the high limit screw to align the center of the guide pulley with the outer face of the smallest cog.
- Alt 2: For SRAM derailleurs, adjust the high limit screw to align the inner face of the guide pulley with the outer face of the smallest cog.
- Use the tightest setting of the above that provides smooth shifting onto the smallest cog.
- Manually move the derailleur away from its location under the smallest cog and let it swing back into position to see if its alignment is as expected.
Set Low Limit
- Manually move the derailleur through its range of motion until it is under the biggest cog.
- Adjust the low limit screw to position the guide pulley directly under (in alignment with) the biggest cog. Refer to the diagram for the direction to turn the limit screws.
- Manually move the rear derailleur away from and back against the low limit screw to check if it stops directly below the biggest cog.
- Let the rear derailleur return to its neutral position under the smallest cog.
Fine Tuning High & Low Limit Settings
- Install or replace the chain if the previous settings were made without the chain.
- While pedaling the bike, manually move the derailleur through its range of motion repeatedly to see is there is any hesitation or over shifting. The chain should move smoothly onto the smallest and largest cogs.
- Adjust the high and low limit screws as necessary to allow the derailleur to shift accurately to the largest and smallest cogs.
If the chain will not drop to the smallest cog despite adjusting the limit screw and adjustment barrel, you may need to adjust the cable tension by loosening the anchor bolt and readjusting the cable cable slack. It may be too loose or too tight. Remember to preset the adjusting barrels before adjusting the cable tension: Turn all the way in (clockwise) and then back out (counter clockwise) 1 revolution.
Note: Once high and low limit screws have been adjusted there is no reason to touch them again. All further adjustment is accomplished with cable tension.
Set Cable Tension
- With the chain on the smallest cog, grasp the cable with pliers and pull lightly to remove any slack.
- While maintaining tension on the cable, tighten the cable anchor bolt enough to hold the cable in place.
- Shift the rear derailleur one click to move it one cog inward.
- If the derailleur fails to shift one cog, the derailleur cable may be too slack. Inspect the cable run. Loosen the anchor bolt, pull slack from cable and re-tightens the anchor bolt.
- If chain shifts one cog, but makes noise, the derailleur is moving too far. Turn barrel adjuster clockwise until noise disappears.
- Adjust the barrel in 1/4 turn increments.
- Shift up and down through the gear range to ensure smooth, quiet and responsive performance using the adjustment barrel to fine tune alignment.
- Peddle the bike at 60 rpm when testing the shifting–do not peddle slowly.
- If the rear cassette shifts well in the smallest front chainring, it will likely work well in other front chainrings.
- Torque the cable anchor bolt. Typical anchor bolt torque is 35 inch pounds (4 Nm).
- If you cannot adjust the rear derailleur satisfactorily, restart the process from the beginning..
Set Body Angle
- Shift the chain inboard: Smallest chainring in the front and biggest cog in the back
- There should be a distance equal to the width of the chain between the biggest cog and the guide pulley (5–10 mm).
- Turn the angle adjustment screw (b-screw) counter clockwise to reduce the space and clockwise to increase the space to achieve the desired distance.
Front Derailleur Adjustment
The following procedure is for a bike equipped with a bottom pull-bottom swing front road derailleur. For these derailleurs the low limit screw is the one on the left or closest to the frame.
Front Derailleur Adjustment Sequence
- Set Derailleur Location
- Set Low Limit
- Set Cable Tension
- Set High Limit
Set Derailleur Location
- Loosen the front derailleur cable anchor/pinch bolt to relieve all tension on the derailleur if the cable is attached.
- Remove the chain from the chainrings so that the chain is loose and does not push against the front derailleur.
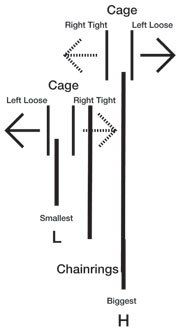
- Shift front derailleur over the teeth of the largest chainring.
- The outside plate of the derailleur cage should roughly parallel the curve of the biggest chainring when viewed from the side.
- The outside plate of the derailleur cage should parallel the face of the biggest chainring when viewed from above.
- Measure the distance between the longest teeth on the biggest chainring and the outside plate of the derailleur cage at the front of the plate. The distance should be between 1–3 mm or about the thickness of a penny. Use a penny as a feeler gauge.
- If front derailleur is in proper location, replace the chain onto the front chainring and proceed to set the low limit.
- If the front derailleur is not located correctly, loosen the front derailleur clamp and adjust the height and orientation of the cage as required.
- Tighten and the torque the front derailleur clamp bolt to between 44 and 60 inch pounds (5 to 7 Nm) for Shimano and SRAM derailleurs.
Note: Tightening and torqueing the clamp bolt may change the location of the derailleur so check location after the clamp is torqued. Adjust if required.
Set Low Limit
- Preset the adjusting barrels: Turn all the way in (clockwise) and then back out (counter clockwise) 1 revolution.
- Shift the chain inboard to the smallest chainring in the front and the largest cog in the back.
- Loosen the front derailleur cable anchor/pinch bolt to relieve all tension on the derailleur.
- Adjust the low limit screw to position the inside surface if the inner derailleur plate as close to the chain as possible without rubbing (1 mm or the thickness of a dime) that produces crisp shifting. The distance should be set for the tightest point in the chainring rotation.
- Check the position by peddling the bike with some resistance on the rear wheel.
- When appropriate adjustment has been achieved, pull the cable to take up slack and put the cable under tension. Tighten the cable anchor bolt tight enough to keep cable from slipping.
Set Cable Tension: Triple
- Shift to middle chainring.
- Adjust the cable tension with the barrel adjuster to position the inside surface if the inner derailleur plate as close to the chain as possible without rubbing (1 mm).
- Check the tension by peddling the bike with some resistance on the rear wheel.
Set High Limit: Triple
- Move the chain to the outboard position–shift to the small chainring in the back and the large chainring in the front. If the bike has a double, the chain will already be on the large chainring in the front.
- Adjust the high limit screw to position the inside surface if the outer derailleur plate as close to the chain as possible without rubbing (1 mm). The space should hold when you push against the limit screw.
- Seat the system by shifting through the gears several times.
- Check and adjust as needed.
- Torque the front derailleur anchor bolt to between 44 and 60 inch pounds (5 to 7 Nm) for Shimano and 44 inch pounds (5 Nm) for SRAM derailleurs.